Last update 6/11/2023
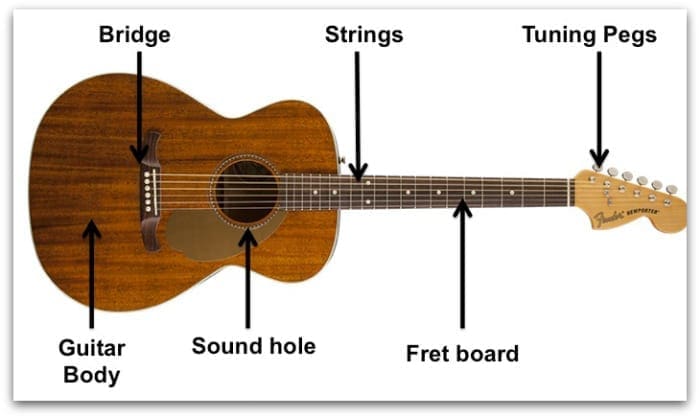
This guide will show you how to perform an acoustic guitar setup for the best sound and that it plays as well as possible. That’s what you want, right?.
Table of contents
- Adjusting the truss rod is not scary; it’s easy.
- Intonation.
- Some common issues for acoustic guitars
- Guitar with high-action
- Tools and Materials Needed for Guitar Setup
- Checking and Adjusting the Neck Relief
- Adjusting the Action at the Saddle
- Setting the Intonation
- Cleaning and Conditioning the Fretboard
- Changing Strings and Proper String Tension
- Lubricating the Nut and Saddle
- Final Adjustments and Fine-tuning
- Testing and Evaluating the Setup
- Maintaining a Well-set-up Guitar
- Care program for the guitar
- Summary
Take our word for it; knowing how to set up your acoustic to look and play great properly is easier than you imagine.
Let’s take a quick look at what we will discuss going forward.
Adjusting the truss rod is not scary; it’s easy.

Checking the action, all that means is the string height from the top of the frets.
Intonation.
We want to know that the guitar is playing to the correct pitch regardless of where any given note is being played on the fretboard. Adjusting the intonation simply means lengthening or shortening a guitar string so it retains the current pitch anywhere up and down the fretboard.
Some common issues for acoustic guitars
String buzz: the strings are touching a fret when they shouldn’t be making a buzzing sound as you play; it’s annoying but fixable.
Guitar with high-action
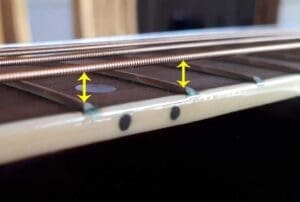

High action simply means the strings are hard to press; we will show you how to fix them.
Sharp frets are caused by the frets protruding at the side of the neck. It makes playing uncomfortable. We show you how to fix it.
Tools and Materials Needed for Guitar Setup
Gathering the necessary tools and materials is important before diving into the nitty-gritty of guitar setup. Here’s a list of items you’ll need to get the job done. These tools won’t break the bank and will pay for them. Selves over time
1. Screwdriver set: You’ll need a set of screwdrivers of various sizes, including both Phillips and flathead.
2. Allen wrenches: Acoustic guitars usually have truss rods that require adjustment using an Allen wrench or key.
3. String action gauge: This tool helps measure the distance between the strings and the fretboard, ensuring proper string height. Well worth buying.
4. Capo: A capo is handy for temporarily raising the pitch of the strings, allowing you to make adjustments without detuning the guitar. It’s not a must, but it’s handy to have.
5. String cutter: When restringing, you’ll need a string cutter to trim excess string length.
6. String winder: This tool makes changing strings faster and easier.
7. Guitar polish and cloth: Keep your guitar looking and feeling fresh by using guitar polish and a soft cloth for cleaning. Microfibre is a popular choice.
8. Fretboard conditioner: Extreme neglect and a climate may mean a dry fretboard. Use a few drops of quality fretboard conditioner occasionally.
Before you start, we recommend grabbing a copy of your guitar’s specifications. Online might be your best choice.
Sticking to the guitar manufacturer’s recommendations is highly recommended.
Let’s move on to the first step: checking and adjusting the neck relief.
Checking and Adjusting the Neck Relief
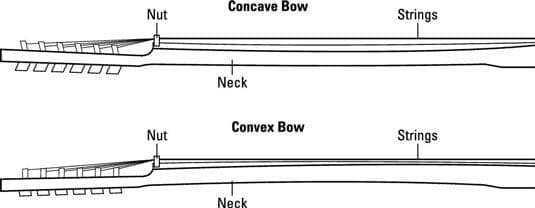
The neck relief of an acoustic guitar refers to the slight curvature of the neck. This curvature is essential for maintaining proper string action and preventing buzzing. You can use a straightedge or specialized tool called a neck relief gauge to check the neck relief. Here’s how to do it:

1. Detune your guitar: Start by loosening all the strings to relieve tension on the neck.
2. Place the straightedge or neck relief gauge on the frets: Position it to touch the frets between the 1st and 14th frets. (If you do not have a straight edge, see below.)
3. Look at the gap between the straightedge and the frets: Ideally, there should be a slight gap in the middle about the thickness of a business card.
4. Adjust the truss rod: If the gap is too large or nonexistent, you’ll need to adjust the truss rod. Insert the appropriate-sized Allen wrench into the truss rod adjustment nut, usually inside the soundhole or at the headstock.
Clockwise turns tighten the truss rod, reducing the neck relief, while counterclockwise turns loosen it, increasing the neck relief. Make minor adjustments and recheck until the desired gap is achieved.
Very important: Do not make adjustments of more than a quarter of a turn. The result of your adjustment will only sometimes be apparent right away.
If you dont have an appropriate straightedge
- You can use a capo and a tuner to adjust the truss rod for an acoustic guitar without a straight edge.
- Place the capo at the first fret.
- Pluck the sixth string and tune it to E.
- Place your left-hand index finger on the sixth string at the 12th fret.
- Place your right-hand index finger on the sixth string at the bridge.
- Look down the neck of the guitar and see if there is a gap between the string and the 12th fret.
- If there is a gap, turn the truss rod clockwise until the gap is gone.
- If there is no gap, or if the string is touching the 12th fret, turn the truss rod counterclockwise until there is a small gap.
- Repeat steps 2-7 until the neck is straight.
- If the adjuster seems overly tight, get some help from an experienced technician. Please do not force it!
Once you’ve adjusted the neck relief, it’s time to move on to adjusting the action at the saddle.
Adjusting the Action at the Saddle
An acoustic guitar’s action refers to the strings’ height above the fretboard. A proper string action ensures comfortable playability and prevents excessive fret buzz. Adjusting the action at the saddle involves altering the saddle’s height, which is located on the bridge of the guitar. Here’s how to do it:


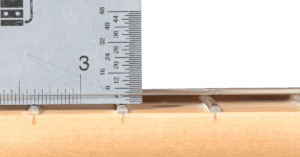
1. Measure the current string action: Use a string action gauge to measure the distance between the bottom of the string and the top of the 12th fret. The recommended action for acoustic guitars is typically between 3-4mm on the bass side and 2-3mm on the treble side. Check the specifications for your guitar.
2. Remove the strings: Loosen and remove the strings to access the saddle.
3. Sand the bottom of the saddle: If you need to lower the action, gently sand the bottom using sandpaper. Take small amounts off at a time and check the action frequently to avoid taking off too much.
4. Reinstall the saddle and strings: Once you’ve achieved the desired action, reinstall the saddle and attach new strings. Make sure to align the strings properly in the saddle slots and tune the guitar to pitch.
After adjusting the action at the saddle, setting the intonation to ensure accurate pitch across the entire fretboard is crucial.
Setting the Intonation
Intonation refers to the accuracy of the guitar’s pitch along the fretboard. When the intonation is set correctly, each note played on the guitar should be in tune, regardless of its position on the fretboard. To set the intonation, follow these steps:
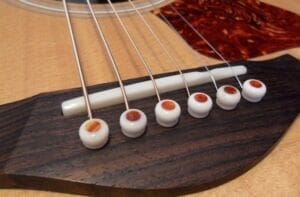

1. Tune your guitar: Make sure your guitar is properly tuned using an electronic tuner.
2. Play the 12th fret harmonic: Lightly touch the string directly above the 12th fret and pluck it to produce a harmonic.
3. Compare the harmonic to the fretted note: Play the exact string while pressing it down firmly on the 12th fret. Listen for any discrepancies in pitch between the harmonic and the fretted note.
4. Adjust the saddle position: Move the saddle slightly back if the fretted note is sharp compared to the harmonic. If it’s flat, move the saddle forward. Make minor adjustments and retune between each adjustment.
5. Repeat the process for all strings: Repeat each string’s steps, ensuring the intonation is accurate across the entire fretboard.
Setting the intonation ensures that your guitar will sound in tune no matter where you play on the neck. Once you’ve finished setting the intonation, it’s time to clean and condition the fretboard.
Cleaning and Conditioning the Fretboard
The fretboard of an acoustic guitar requires regular cleaning and conditioning to keep it looking and feeling its best. Over time, dirt, sweat, and grime can accumulate on the fretboard, affecting playability and tone.
Here’s how to clean and condition your fretboard


1. Remove the strings: Loosen and remove the strings to access the fretboard.
2. Wipe down the fretboard: Use a soft, lint-free cloth to wipe away any surface dirt or debris from the fretboard. Be gentle to avoid scratching the wood.
3. Apply fretboard conditioner: Apply a small amount onto a clean cloth. Rub it into the wood, covering the entire fretboard. Let it sit for a few minutes to allow the conditioner to penetrate the wood.
4. Wipe off excess conditioner: Using a separate clean cloth, wipe off any excess conditioner from the fretboard. Be thorough but gentle to avoid leaving residue behind.
5. Reinstall the strings: Once the fretboard is clean and conditioned, restring your guitar and tune it back to pitch.
Regular cleaning and conditioning of the fretboard will help maintain its moisture balance, prevent drying out, and prolong its lifespan. Next, let’s move on to changing strings and ensuring proper string tension.
Changing Strings and Proper String Tension
Changing strings is essential to maintenance, as old strings can affect your acoustic guitar’s tone and playability. It’s crucial to ensure proper string tension and avoid over-tightening when changing strings. Here’s a step-by-step guide:


1. Loosen and remove the old strings: Use a string winder to loosen the tension of each string before removing them from the tuning pegs.
2. Clean the body of the guitar: Take this opportunity to clean the body of your guitar using a soft cloth. Remove any dust, fingerprints, or smudges to keep your instrument looking its best.
3. Install new strings: Starting with the thinnest string, thread it through the corresponding hole in the bridge and bring it up to the headstock. Insert the string through the appropriate tuning peg and begin winding it until it’s secure. Repeat this process for each string, making sure to wind them in the correct direction.
4. Tune the guitar to pitch: Once all the strings are attached, use an electronic tuner to tune your guitar to pitch. Take your time to ensure each string is properly tuned.
5. Check string tension: Gently press down on each string between the 1st and 2nd frets. There should be a small gap between the string and the 7th or 8th fret. If the gap is too large, the string tension may be too low, and if the string touches the fret, the tension may be too high. Make any necessary adjustments to achieve the optimal string tension.
Following these steps, you can change your strings properly and ensure they’re at the correct tension. Now, let’s move on to lubricating the nut and saddle.
Lubricating the Nut and Saddle
The nut and saddle of your acoustic guitar play a crucial role in maintaining proper string action and preventing tuning issues. Lubricating these contact points can help reduce friction, allowing the strings to move more freely and smoothly. Here’s how to lubricate the nut and saddle:


1. Remove the strings: Loosen and remove the strings to access the nut and saddle.
2. Apply graphite to the nut slots: Use a graphite pencil to rub graphite into the nut slots. The graphite is a dry lubricant, reducing friction between the strings and the nut.
3. Apply lubricant to the saddle: Use a small amount of specialized lubricant or petroleum jelly on the saddle where the strings rest. Be sure to apply it sparingly, as excessive lubricant can affect tone and sustain.
4. Reinstall the strings: Once you’ve lubricated the nut and saddle, re-string your guitar and tune it back to pitch.
Lubricating the nut and saddle can help prevent binding and sticking, ensuring smooth string movement and improved tuning stability.
Now that you’ve completed the essential setup steps, it’s time for final adjustments and fine-tuning.
Final Adjustments and Fine-tuning
With the major setup aspects complete, it’s time to make any final adjustments to ensure optimal sound and playability. Here are a few areas to focus on:
1. Bridge pins: Check that the bridge pins are properly seated and secure. Gently press down on each pin to ensure it’s in place.
2. Nut height: Verify the nut height is appropriate by checking the string action at the first fret. If the strings are too high or too low, you may need to file or shim the nut to achieve the desired action.
3. Tuning stability: Play a few chords and individual notes to test the tuning stability. If you notice any issues with the guitar going out of tune quickly, you may need to revisit the nut and saddle lubrication or check for any binding in the tuning pegs.
4. Playability: Take some time to play your guitar and assess the overall playability. Pay attention to any buzzing, discomfort, or other issues needing further adjustment.
By going through these final adjustments, you’ll fine-tune your acoustic guitar to meet your preferences and playing style. Testing and evaluating the results is crucial once you’re satisfied with the setup.
Testing and Evaluating the Setup
After completing the setup process, testing and evaluating the setup is essential to ensure it meets your expectations. Here are a few things to consider:

1. Sound quality: Strum various chords and play melodies to assess the overall sound quality. Listen for clarity, sustain, and resonance.
2. Playability: Test the playability of your guitar by playing scales, arpeggios, and different styles of music. Pay attention to the ease of fretting, string bending, and overall comfort.
3. Intonation accuracy: Play different notes and chords across the fretboard to check for any intonation issues. Listen for any noticeable discrepancies in pitch.
4. String buzz: Pay attention to any buzzing or rattling sounds while playing. Buzzing can be an indication of incorrect setup or uneven frets.
By thoroughly testing and evaluating your guitar setup, you’ll be able to identify any areas that may need further adjustment or refinement.
Remember, every guitarist has their own preferences, so it’s important to tailor the setup to your individual needs and playing style. Once you’re satisfied with the results, it’s time to maintain your well-set-up guitar.
Maintaining a Well-set-up Guitar
Setting up your acoustic guitar is not a one-time job. Regular maintenance is key to keeping your instrument in optimal playing condition. Here are a few maintenance tips:
1. Clean your guitar regularly: Wipe down after each playing session to remove sweat, dirt, or oils. Use a soft cloth and avoid using harsh cleaning products.
2. Keep your guitar properly humidified: Acoustic guitars are sensitive to changes in humidity, which can cause the wood to expand or contract. Use a humidifier or dehumidifier to maintain the ideal humidity level for your guitar.
3. Monitor the neck relief: Check the neck relief periodically to ensure it remains within the desired range. Changes in temperature and humidity can affect the neck curvature.
4. Change strings regularly: Strings lose their brightness and tone over time. Change them regularly to maintain optimal sound quality and playability.
5. Inspect for any issues: Regularly inspect your guitar for any signs of wear, such as loose hardware, cracks, or buzzing frets. Address any issues if found; if not, play the guitar for a while to ensure all is well.
Care program for the guitar
Humidity control – get yourself some accessories to monitor your acoustics’ humidity. Humidity is the enemy of guitars, acoustic guitars especially.
Summary
Going forward, be aware humidity is your acoustic guitar’s biggest enemy. Prevention is the best option; monitor your guitars for humidity; low humidity can, if ignored, potentially damage an acoustic guitar.

